


Install and set up FanControl
FanControl controls us fans and pumps that are connected to the mainboard. In some cases it is also possible to control the fans on the graphics card, but not in all. FanControl overwrites the settings in BIOS/UEFI when it is running (or after automatically with Windows). However, it is still possible to control individual fans via BIOS instead of FanControl. First of all, FanControl from https://github.com/Rem0o/FanControl.Releases downloaded and installed. It goes without saying that the basic hardware such as the mainboard and graphics card are cleanly installed along with their drivers. If this is not the case, FanControl will only be able to detect a few or no PMW connections and their signals.
After the first start of the program, it first proposes a kind of auto-configuration (assisted setup), where it tries to detect all fan connections and the associated speed signals, as well as identify the start and stop speeds. Ideally, some “Controls” will appear afterwards as shown below – the “Speeds” can be shown or hidden and the “Curves” should not be there yet – we will do that in the next step.
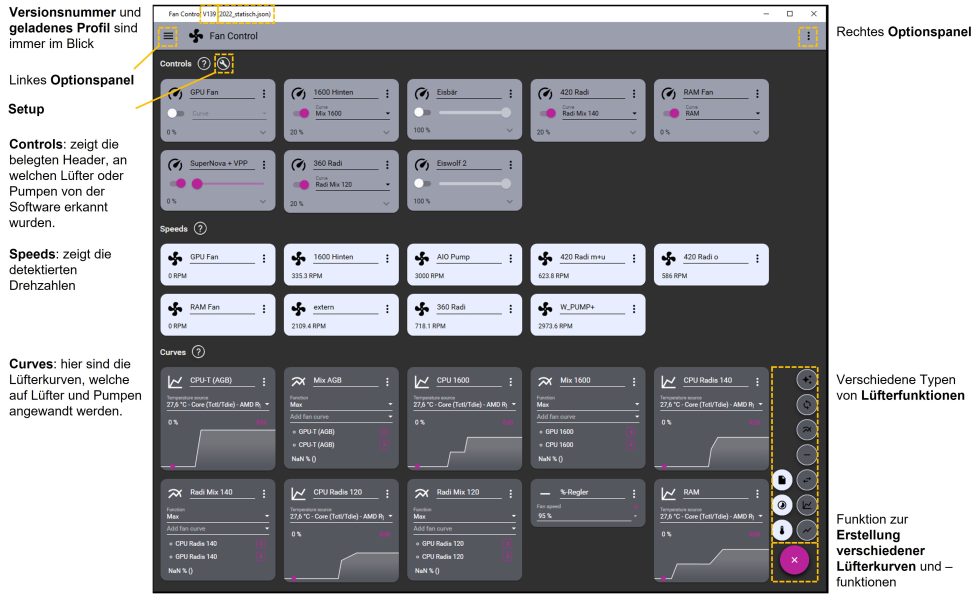
Now you should name the different controls – similar to what I did on the screenshot. Otherwise, it quickly happens that you lose the overview. Once this is done, it’s time to create fan curves. With FanControl we now have the advantage of being able to control one or more fans over one or even more almost arbitrary temperatures!
If I control the fans in the BIOS/UEFI, then I always have only one temperature sensor there, according to which is controlled, e.g. the CPU OR the chipset temperature – and this temperature sensor must belong to the motherboard. Thus, it is not possible to regulate the fan connections from the mainboard according to the temperatures of the graphics card. FanControl now makes it possible to control fans simultaneously e.g. according to CPU AND graphics card temperatures.
I regulate my fans according to CPU and GPU hotspot and always take into account which of the two components is hottest at the moment. In addition, I have two AIO water pumps, which always run at 100% (should!) and a D5 pump, which I control manually via FanControl (minimum speed in normal operation and maximum speed when benching).
This is the right way to do it!
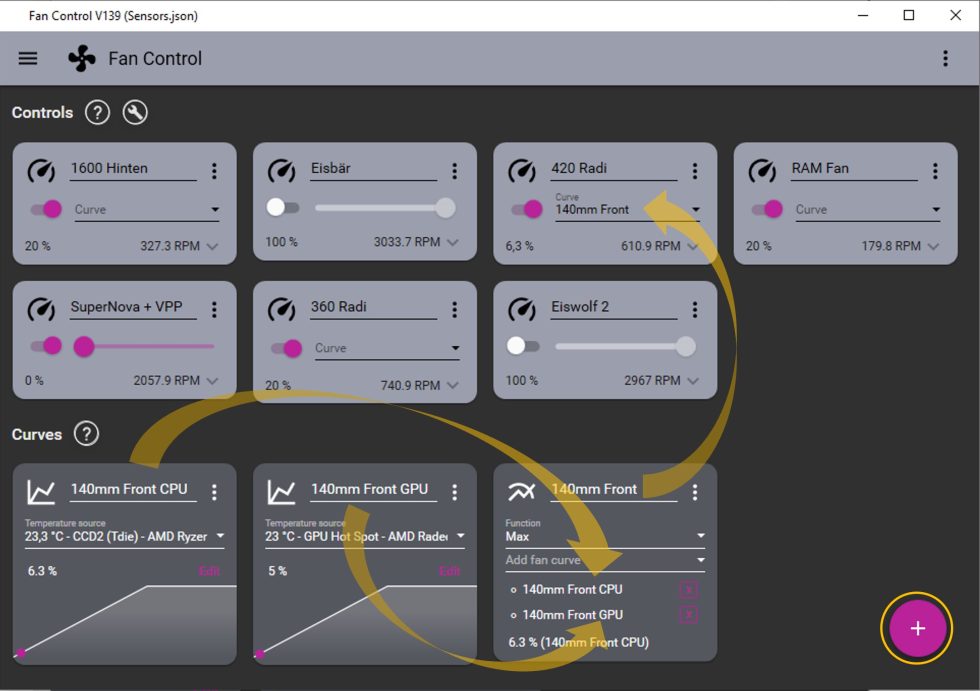
Let’s get two Graph Fan Curves and one Mix Fan Curve via the plus button at the bottom right and name them according to CPU and GPU plus fan type, e.g. “140mm Front CPU”, “140mm Front GPU”. I then call the mix function “140mm Front”. Next I have to define a temperature source for each Graph Fan Curve – this should also match the name, e.g. 140mm Front CPU à CCD2 (Tdie).
Now we add these two just created graphs to the Mix Fan Curve via Add fan curve and still have to define at Function how the mix should work – usually we choose Max, which means that this mix function always takes the component (CPU or GPU) with the higher (=max) temperature and uses its fan curve. In the last step, we now select at the top of the controls, which fan connector should now control according to the function just created – the one on which my 140mm front fans (one or more) hang.
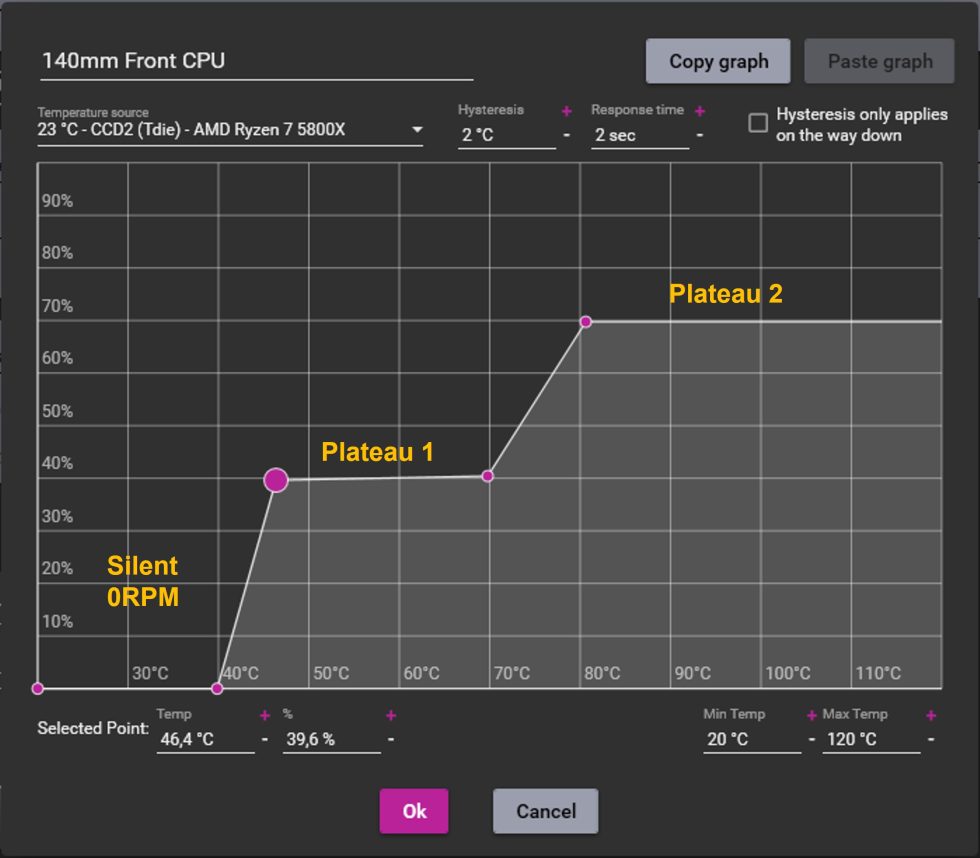
The basic principle is now understood, but we still don’t have a reasonable fan curve. How to do this in theory will be explained on the following pages – here first how to do it concretely in FanControl. We simply click edit on one of the graphs and off we go. Here I can now define a silent mode on the left (if the fans can also do 0RPM), followed by gradients, plateaus if necessary, etc. This is done nicely graphically by left-clicking in the graph – and right-clicking on a point removes it again.
The response time can be set to a few seconds – for fans a few, for pumps a few more. It also makes sense to set a few °C for the hysteresis. All these measures help to ensure that the fans behave as quietly as possible and do not constantly ramp up and down with the very fast temperature changes of the chips. If fans don’t start howling immediately, it’s not dangerous for the chips – they don’t overheat. If it gets too hot, they regulate themselves down in the ms range until sufficient cooling is ensured – neither air nor water cooling can react as quickly as a modern Ryzen clocks itself up and down today, for example.
This is how FanControl works in principle!
More experienced users can now take advantage of a few more useful features:
- Any temperature can be placed in the Windows tray at the bottom right
- The respective controls can also be operated completely manually / statically. To do this, click on the three dots and click Manual Control.
- 1 - Introduction and some basics
- 2 - External fan control
- 3 - Tutorial: How to use FanControl
- 4 - Tutorial: Erstellung von Lüfterkurven
- 5 - Fine tuning, proof of concept and conclusion


153 Antworten
Kommentar
Lade neue Kommentare
Veteran
Moderator
Urgestein
Urgestein
Urgestein
Mitglied
Veteran
Urgestein
Urgestein
Urgestein
Veteran
Urgestein
Veteran
Urgestein
Veteran
Urgestein
Veteran
Urgestein
Alle Kommentare lesen unter igor´sLAB Community →