
029-33313798
185-0928-7420
Novacam 3D 计量系统生成什么样的数据?
What kind of data do Novacam 3D metrology systems generate?
Novacam 3D 计量系统生成什么样的数据?
This is a valid question when evaluating any 3D metrology solution.
What data will it give me? And what’s the utility of that data?
在评估 3D 计量解决方案时,这是一个有效的问题。它会给我什么数据?这些数据有什么用?
This article presents the
3 types of data generated by Novacam non-contact 3D metrology systems
(the
BoreInspect,
TubeInspect,
SurfaceInspect,
EdgeInspect
and Microcam
Profilometer). Deployed across high-precision industries, the systems simultaneously generate a
3D point cloud, a light intensity map, and a height map
from each scan.
本文介绍了Novacam 非接触式 3D 计量系统
(BoreInspect、TubeInspect、SurfaceInspect、EdgeInspect和 Microcam
Profilometer)生成的 3 种数据类型。这些系统部署在高精度行业,
每次扫描都会同时生成3D 点云、光强度图和高度图。
The three data sets may be used separately or in combination to:
这三个数据集可以单独使用或组合使用,以:
provide micron-precision measurements of dimensions (GD&T) and surface quality parameters, and
提供微米级精度的尺寸测量 (GD&T) 和表面质量参数,以及
offer unprecedented insight into our clients’ manufacturing processes.
为我们客户的制造过程提供前所未有的见解。
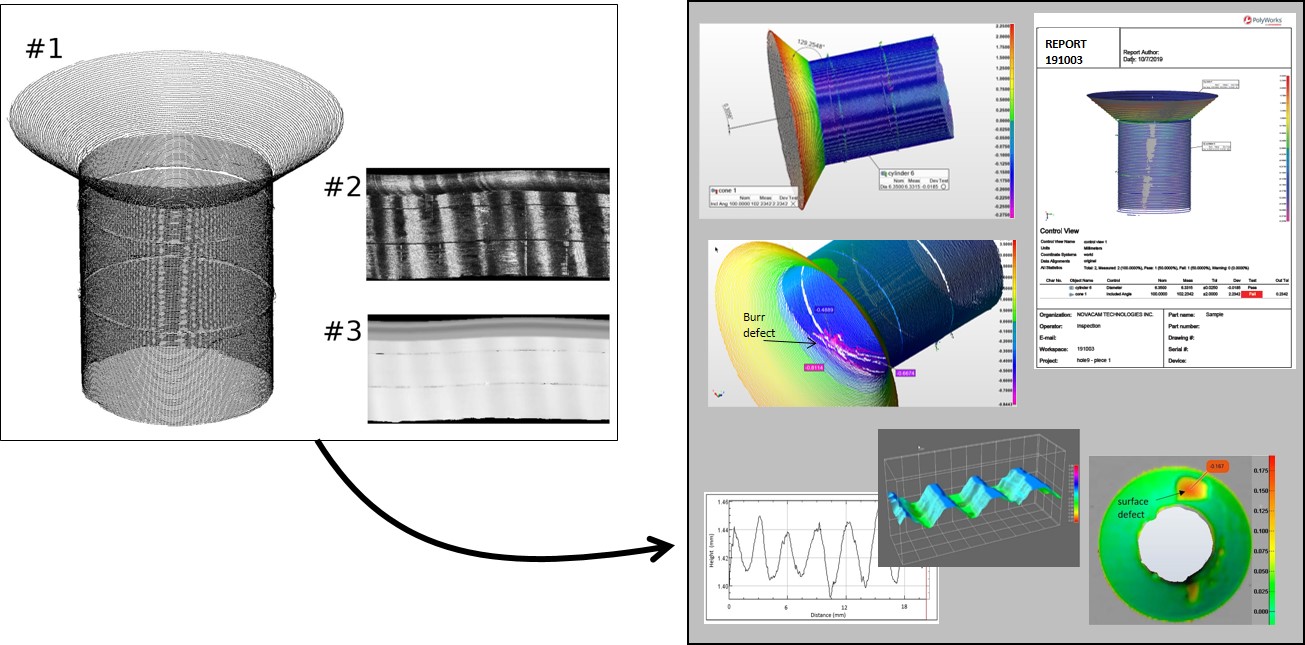
The 3 types of data generated by Novacam 3D metrology systems provide a solid basis for rapid automated dimensional measurements, for defect detection and measurement, interactive visualization, and more.
Novacam 3D 计量系统生成的 3 种类型的数据为快速自动尺寸测量、缺陷检测和测量、交互式可视化等提供了坚实的基础。
First, a quick intro to the technology and mode of measurement with the systems.
首先,快速介绍系统的技术和测量模式。
Intro to technology and mode of measurement
技术介绍和测量方式
Novacam 3D metrology systems are based on low-coherence interferometry.
They acquire surfaces in a non-contact
point-by-point
manner: a fiber-based optical probe directs light onto the measured surface and collects reflected light signals, which are then processed by the system’s Microcam-3D/4D interferometer.
Novacam 3D 计量系统基于低相干干涉测量法。它们以非接触式逐点方式获取表面:基于光纤的光学探头将光引导到被测表面并收集反射光信号,然后由系统的 Microcam-3D/4D 干涉仪进行处理。
Depending on the interferometer model,
up to 100,000 3D point measurements are acquired per second.
For example, a 10 second scan with a system that uses a Microcam-4D interferometer generates 1 Million 3D measurement points
along a
user-set scan path.
根据干涉仪型号,每秒可采集多达 100,000 个 3D 点测量值。例如,使用 Microcam-4D 干涉仪的系统进行 10 秒扫描会沿着
用户设置的扫描路径生成 100 万个 3D 测量点。
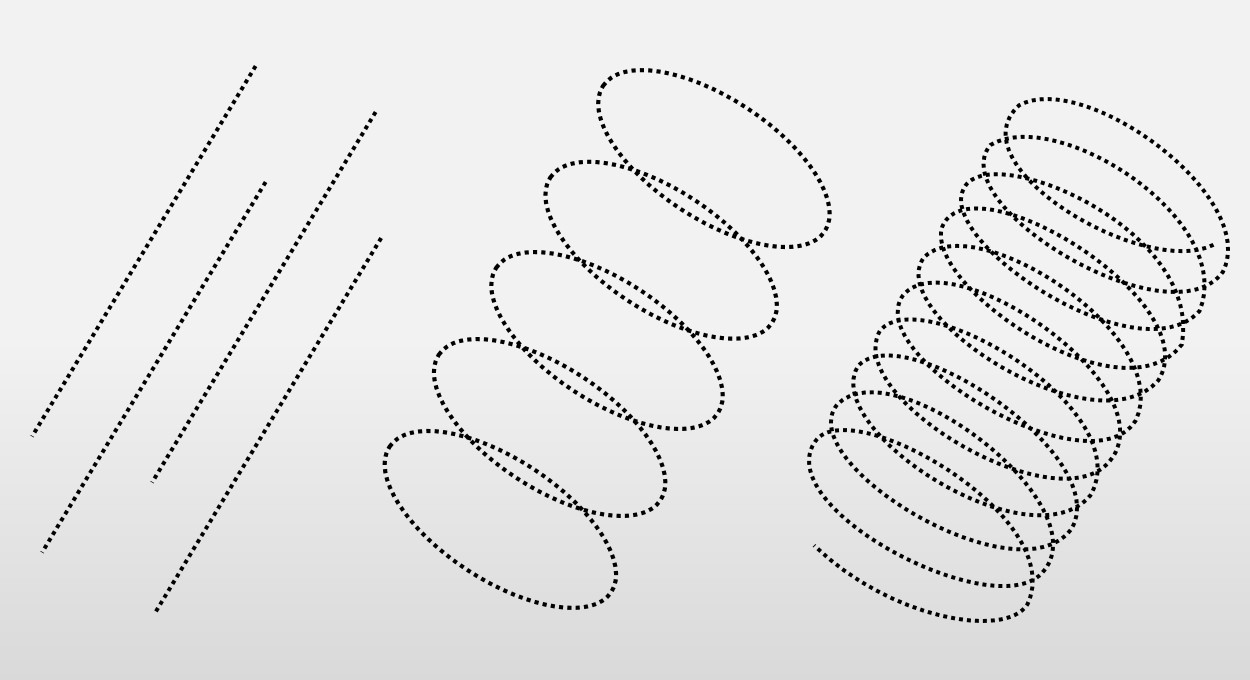
A scan path is typically linear, circular, or spiral.
扫描路径通常是线性的、圆形的或螺旋形的。
Novacam acquisition software allows users to automate the measurement cycle, including scanning, data analysis, and subsequent reporting. To automate these repetitive tasks, users configure
scan definitions, which comprise measurement sequences and subsequent reporting.
Novacam 采集软件允许用户自动化测量循环,包括扫描、数据分析和后续报告。为了自动执行这些重复性任务,用户配置扫描定义,其中包括测量序列和后续报告。
Scan definitions are invoked automatically by a PLC (programmable logic controller) or by an operator with the push of a button.
In this way, the inspection cycle and the measurements obtained are independent of the operator.
扫描定义由 PLC(可编程逻辑控制器)或操作员按下按钮自动调用。这样,检查周期和获得的测量值与操作员无关。
Example of a scanned object – a drilled fastener hole
扫描对象示例——紧固件钻孔
For a concrete illustrative example of the data generated, we scanned the inside diameter (ID) surface of a 6.25 mm (¼”)-diameter rivet hole drilled through a stack of 3 aluminum plates.
The total plate stack thickness is about 9.4 mm (3/8”)), and the rivet hole has a 100 degree (nominal) countersink at the top opening.
对于所生成数据的具体示例,我们扫描了一个 6.25 毫米 (¼”) 直径铆钉孔的内径 (ID) 表面,该铆钉孔钻穿了 3 块铝板的堆叠。板堆叠总厚度约为 9.4 毫米(3/8 英寸),铆钉孔在顶部开口处有一个 100 度(标称)埋头孔。
To measure, we used Novacam
BoreInspect
3D metrology system equipped with a 3.05 mm diameter rotational probe.
为了进行测量,我们使用了配备 3.05 毫米直径旋转探头的 Novacam
BoreInspect
3D 计量系统。
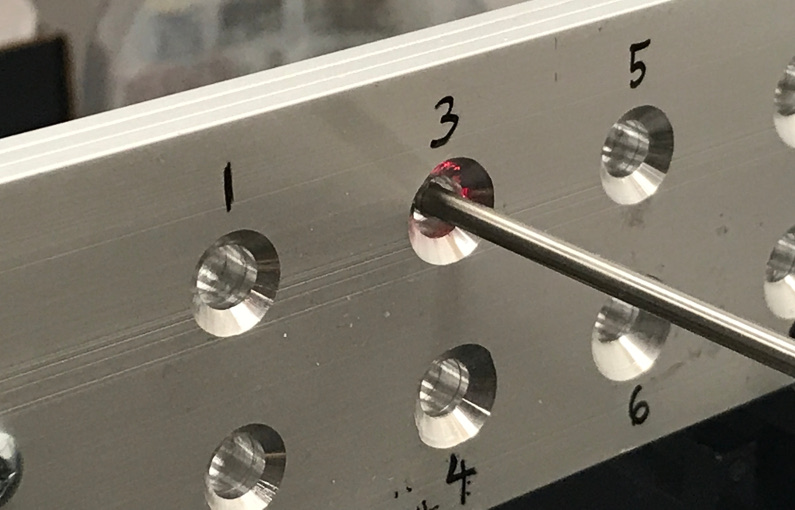
To measure the ID of a 6.35 mm (¼”) rivet hole, we used the BoreInspect 3D metrology system equipped with a 3.05 mm diameter rotational probe.
为了测量 6.35 毫米 (¼”) 铆钉孔的内径,我们使用了配备 3.05 毫米直径旋转探头的 BoreInspect 3D 计量系统。
We selected a spiral scan path and then we scanned the hole twice – once at a high density (with a very small spiral pitch) and once at a lower density (with a larger spiral pitch).
我们选择了螺旋扫描路径,然后对孔进行了两次扫描——一次是高密度(螺旋间距非常小),另一次是低密度(螺旋间距较大)。
Please see the diagram for a definition of a spiral pitch.
请参阅图表以了解螺旋间距的定义。
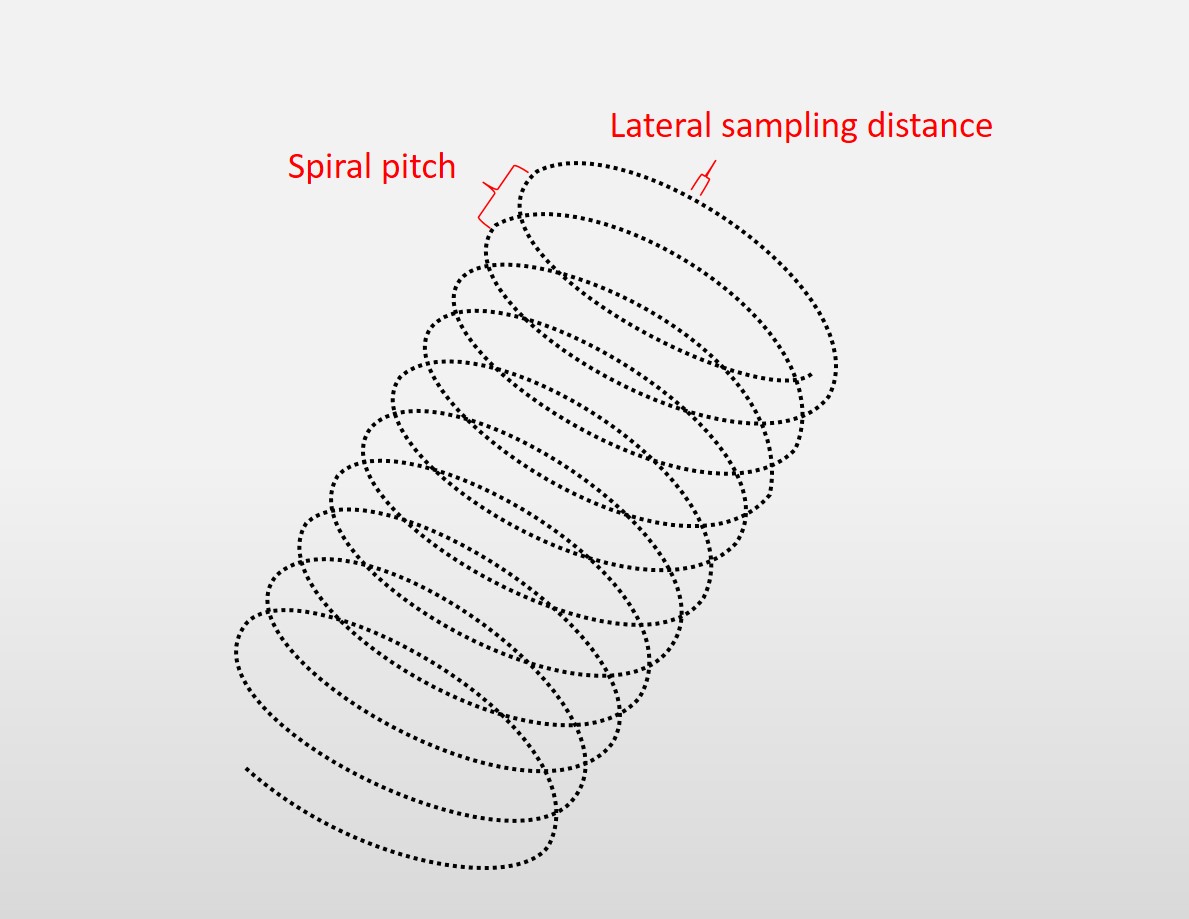
The pitch of the scan spiral is a partial determinant of the speed of an ID scan. The other is the rotation speed of the probe.
扫描螺旋的螺距是 ID 扫描速度的部分决定因素。另一个是探头的旋转速度。
Data set #1: 3D point cloud
数据集 #1:3D 点云
The first type of data generated is a 3D point cloud, which is a set of data points associated with X,Y,Z coordinates. It represents the set of points measured on the object surface and in effect describes the surface in a 3D space.
生成的第一类数据是 3D 点云,它是一组与 X、Y、Z 坐标相关联的数据点。它表示在物体表面测量的一组点,有效的描述了 3D 空间中的表面。
As mentioned earlier, with Novacam 3D metrology systems, the path of the scan and the density of the point cloud is set by the user depending on their measurement needs.
Here below we show two point clouds – one generated from a high-density spiral scan and the other from a lower-density spiral scan of the same rivet hole.
如前所述,使用 Novacam 3D 计量系统时,扫描路径和点云密度由用户根据测量需要设置。下面我们展示了两个点云——一个由高密度螺旋扫描生成,另一个由同一铆钉孔的低密度螺旋扫描生成。
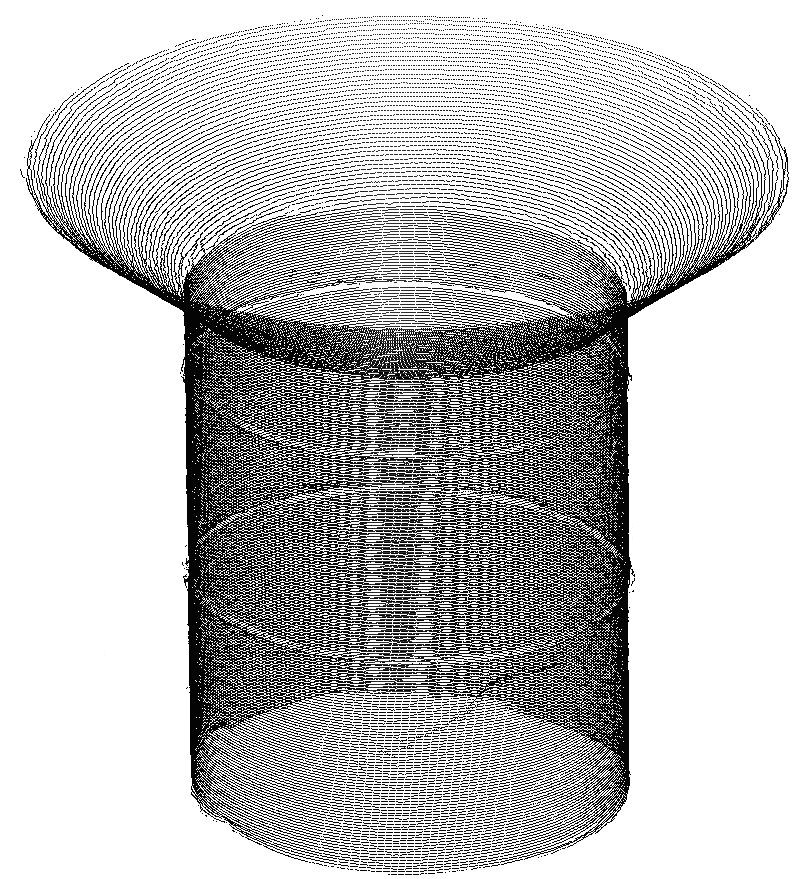
To acquire this high-density 3D point cloud of the rivet hole ID, the spiral pitch of acquisition was set to 0.05 mm (~2,000 µin.). The scan took 9.5 seconds and the point cloud comprises over 947,000 3D measurement points. High-density scans are typically required to detect and measure small defects.
为了获取铆钉孔 ID 的这种高密度 3D 点云,采集的螺距设置为 0.05 毫米(~2,000 微英寸)。扫描耗时 9.5 秒,点云包含超过 947,000 个 3D 测量点。通常需要高密度扫描来检测和测量小缺陷。
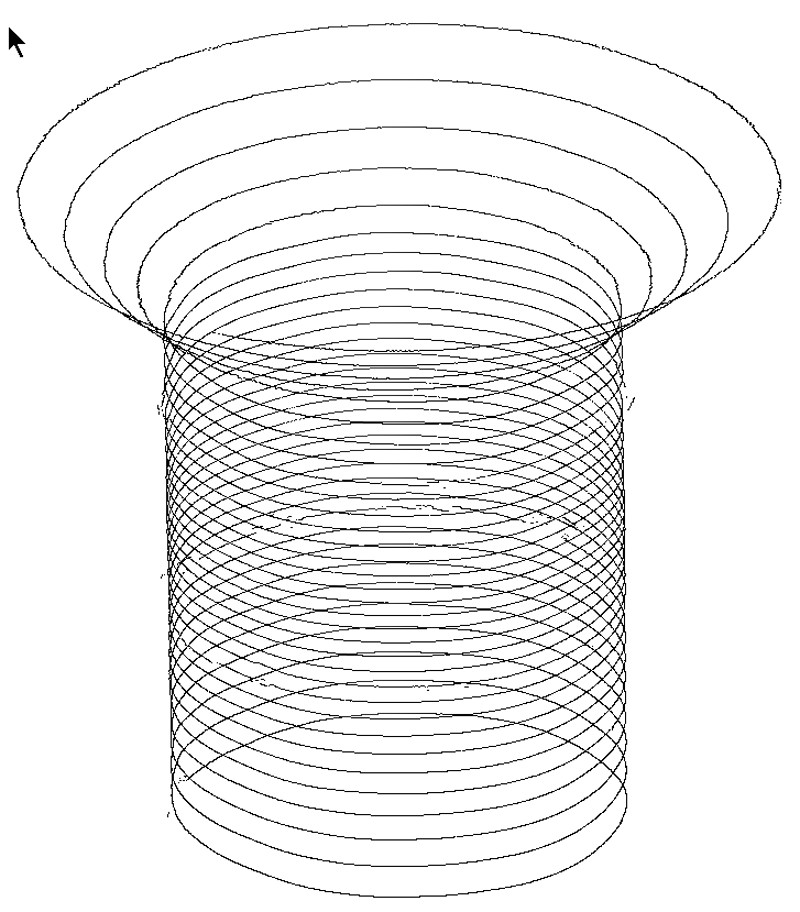
To speed up the scan, the spiral pitch was increased to 0.4 mm (~0.016”). This scan took 1.2 seconds and the generated 3D point cloud comprises 118,448 3D measurement points – more than enough for extracting GD&T (dimensional) geometry parameters.
为了加快扫描速度,螺旋间距增加到 0.4 毫米(~0.016 英寸)。此扫描耗时 1.2 秒,生成的 3D 点云包含 118,448 个 3D 测量点——足以提取 GD&T(尺寸)几何参数。
3D point cloud data is most often used for rapid dimensional measurements. The cycle time of scanning and 3D data analysis may be optimized to support automated inspection even in high throughput manufacturing.
3D 点云数据最常用于快速尺寸测量。可以优化扫描和 3D 数据分析的周期时间,以支持自动化检查,即使在高通量制造中也是如此。
Extracting dimensional measurements from a point cloud
从点云中提取尺寸测量
The 3D point cloud is output as a data file that is analyzed interactively or automatically using CAD/GD&T (computer aided design/geometric dimensioning & tolerancing) software. Novacam offers
PolyWorks InspectorTM, an industry-standard third party CAD/GD&T software, as an option with our 3D metrology systems. The software provides powerful capabilities for evaluating 3D point clouds with respect to user-defined criteria (nominals and tolerances) or a reference CAD model.
3D 点云作为数据文件输出,使用 CAD/GD&T(计算机辅助设计/几何尺寸和公差)软件进行交互式或自动分析。Novacam 提供PolyWorks Inspector TM,这是一种行业标准的第三方 CAD/GD&T 软件,作为我们 3D 计量系统的一个选项。该软件提供了根据用户定义的标准(标称和公差)或参考 CAD 模型评估 3D 点云的强大功能。
PolyWorks Inspector offers both interactive 3D visualization and analysis, and fully automated analysis and go-no-go reporting. Users may define their own macro-based rivet inspection reports. With automated rivet inspection reports, no operator input is required.
PolyWorks Inspector 提供交互式 3D 可视化和分析,以及全自动分析和是非报告。用户可以定义自己的基于宏的铆钉检验报告。使用自动铆钉检查报告,无需操作员输入。
Depending on the part and the scan system configuration being used, dimensional measurements may include distance (length, height, width), diameter, angle, straightness, flatness, circularity (roundness), cylindricity, profile of a line, profile of a surface, angularity, perpendicularity, parallelism, position, concentricity, symmetry, circular runout, etc.
See the list of dimensional measurements, along with examples
of such measurements carried out by Novacam 3D metrology systems.
根据所使用的零件和扫描系统配置,尺寸测量可能包括距离(长度、高度、宽度)、直径、角度、直线度、平面度、圆度(圆度)、圆柱度、线的轮廓、表面的轮廓、角度、垂直度、平行度、位置、同心度、对称度、圆跳动等。
请参阅尺寸测量列表,以及由 Novacam 3D 计量系统执行的此类测量的示例。
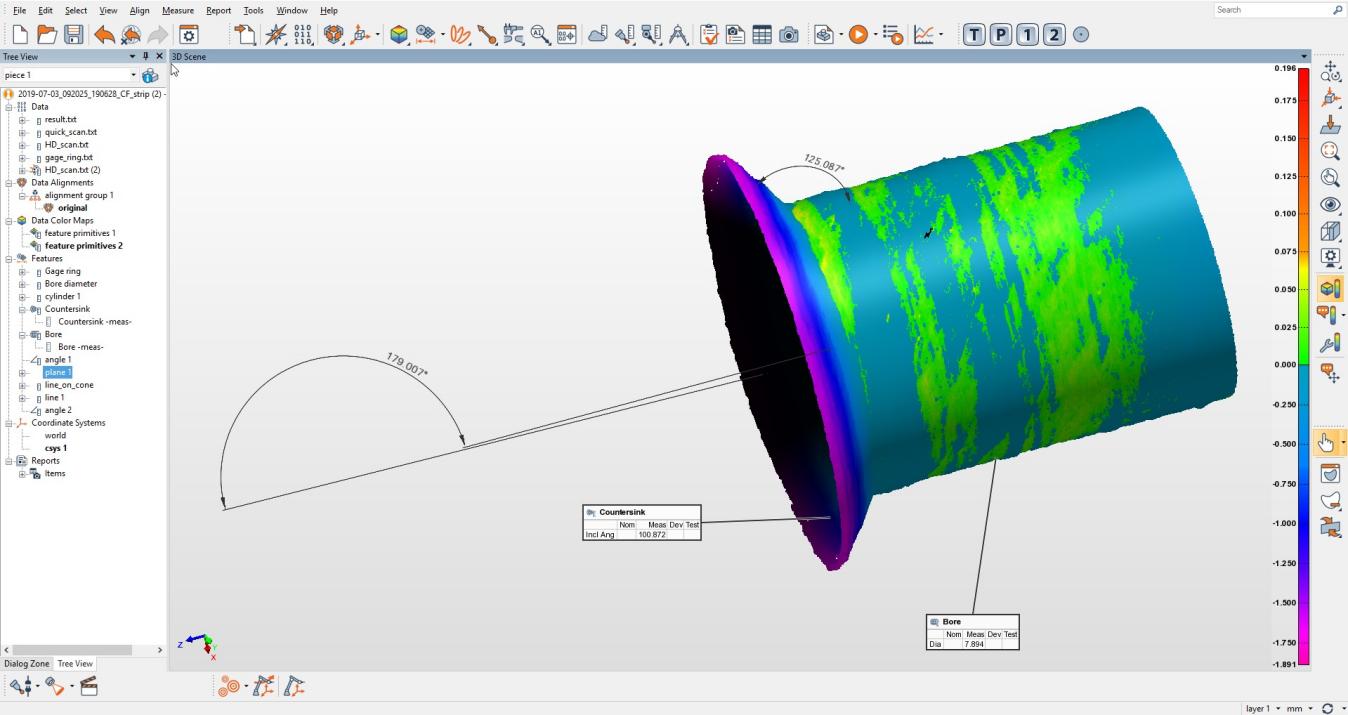
Angle measurement of the rivet hole 3D point cloud carried out in PolyWorks Inspector software.
在 PolyWorks Inspector 软件中进行的铆钉孔 3D 点云的角度测量。
Detecting and measuring defects
检测和测量缺陷
Using the PolyWorks Inspector, users may view the 3D point cloud interactively to examine and measure defects.
Continuing on with our example of the rivet hole, we can easily see two types of defects on the inside diameter:
使用 PolyWorks Inspector,用户可以交互式地查看 3D 点云以检查和测量缺陷。继续我们的铆钉孔示例,我们可以很容易地看到内径上的两种类型的缺陷:
a burr defect between the countersink and the rivet hole and
埋头孔和铆钉孔之间的毛刺缺陷和
inter-laminar gaps, i.e., gaps between the 3 drilled plates.
层间间隙,即 3 个钻孔板之间的间隙。
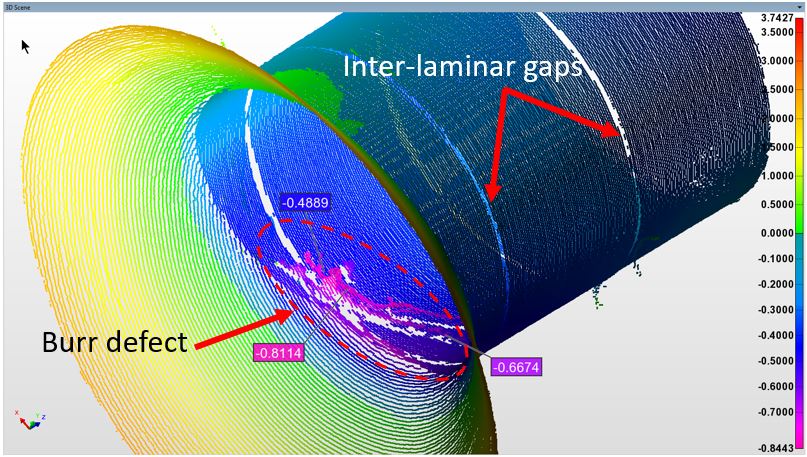
Interactive defect inspection and measurement of rivet hole defects using PolyWorks Inspector software.
使用 PolyWorks Inspector 软件对铆钉孔缺陷进行交互式缺陷检查和测量。
The point cloud may also be analyzed programmatically, automating detection and measurement of defects of pre-specified sizes and shapes.
点云也可以通过编程方式进行分析,自动检测和测量预先指定尺寸和形状的缺陷。
With Novacam 3D metrology systems, defect detection (interactive or programmed) may also be greatly facilitated by using two additional data sets created by the systems: the height maps and light intensity maps.
使用 Novacam 3D 计量系统,通过使用系统创建的两个额外数据集:高度图和光强度图,也可以极大地促进缺陷检测(交互式或程序化)。
Data sets #2 and #3: Light intensity map and height map
数据集 #2 和 #3:光照强度图和高度图
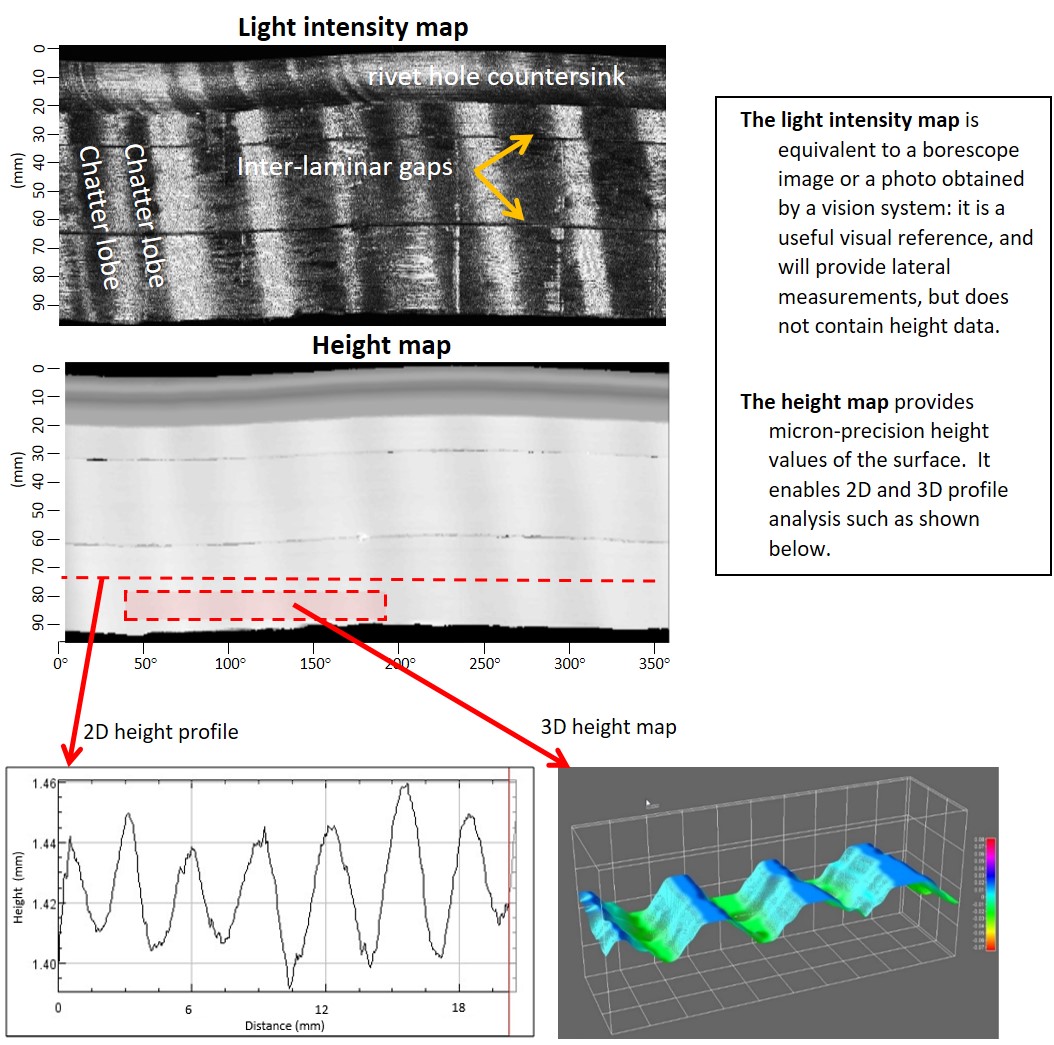
The light intensity and height maps are generated at the same time as the 3D point cloud file. These maps represent an unwrapped view of the scanned surface and are typically very useful for inspecting and measuring defects.
光强度和高度图与 3D 点云文件同时生成。这些图代表扫描表面的展开视图,通常对检查和测量缺陷非常有用。
The
light intensity map
is equivalent to a borescope image or a photo obtained by a vision system: it is a useful visual reference, and will provide lateral measurements, but does not contain height data.
光强图相当于管道镜图像或视觉系统获得的照片:它是有用的视觉参考,将提供横向测量,但不包含高度数据。
The
height map
provides micron-precision height values of the surface.
高度图提供表面的微米精度高度值。
As seen in our rivet hole example, a particularly pronounced chatter defect (a pattern of surface waves) shows on the inside diameter.
Chatter may be measured based on the 3D point cloud but visually it did not stand out in that particular data set.
In contrast, both the height and light intensity maps show the pattern of the 7-lobe chatter clearly as diagonal stripes.
如我们的铆钉孔示例所示,在内径上显示出特别明显的颤振缺陷(一种表面波纹)。颤振可以根据 3D 点云进行测量,但在视觉上它在该特定数据集中并不突出。相比之下,高度图和光强度图都将 7 叶颤振的模式清楚地显示为对角条纹。
The two maps also show the inter-laminar gaps.
These gaps can be measured here as well as in the 3D point cloud data sets.
这两张地图还显示了层间间隙。这些差距可以在这里以及 3D 点云数据集中测量。
In addition to 3D point cloud data, the light intensity map and the height map facilitate defect analysis
除了 3D 点云数据外,光强度图和高度图有助于缺陷分析
The height and light intensity maps are output as 2 separate data files. Both may be viewed using publicly available ImageJ software supplied with Novacam 3D metrology systems. The two maps can be very complementary when used together;
features or defects that stand out visually on the light intensity map may be interactively quantified through 2D or 3D measurements extracted from the height map using ImageJ.
The two data sets may also be analyzed programmatically.
高度和光强度图作为 2 个单独的数据文件输出。两者都可以使用 Novacam 3D 计量系统提供的公开可用的 ImageJ 软件进行查看。这两张地图一起使用时可以非常互补;在光强度图上视觉突出的特征或缺陷可以通过使用 ImageJ 从高度图中提取的 2D 或 3D 测量值进行交互式量化。这两个数据集也可以以编程方式进行分析。
An alternate format of the 3D data – STL (mesh)
3D 数据的另一种格式 – STL(网格)
We occasionally get asked – can you produce a mesh from the scan?
The answer is yes.
我们偶尔会被问到——你能从扫描中生成网格吗?答案是肯定的。
A mesh is a representation of a 3D object using a set of polygon surfaces.
It offers a continuous view of 3D measurement data, much like stretching a skin over the measured 3D points.
网格是使用一组多边形表面的 3D 对象的表示。它提供了 3D 测量数据的连续视图,就像在测量的 3D 点上拉伸皮肤一样。
Novacam data acquisition software provides the option to export scan data directly in STL format, which is a mesh representation of the scanned surface where all polygon surfaces (facets) are triangular. Alternately, the PolyWorks Inspector software may be used to mesh 3D point cloud data and export it in STL format.
Novacam 数据采集软件提供了直接以 STL 格式导出扫描数据的选项,STL 格式是扫描表面的网格表示,其中所有多边形表面(面)都是三角形。或者,PolyWorks Inspector 软件可用于对 3D 点云数据进行网格划分并以 STL 格式导出。
The shown image of an STL mesh was generated from a scan of a rivet hole countersink using Novacam
SurfaceInspect
system.
所示的 STL 网格图像是使用 Novacam SurfaceInspect系统扫描铆钉孔埋头孔生成的。
The mesh view of the countersink offers a continuous view of the 3D surface.
埋头孔的网格视图提供了 3D 表面的连续视图。
文件:AN-THICKNESS-1.2(2021-06-03)
©2021 Novacam Technologies股份有限公司保留所有权利。
Tel/联系电话:
029-33313798
185-0928-7420
Address/地址:
陕西省西咸新区空港新城临空产业园
16号楼(2期6号楼)一单元三楼
Email/邮箱:2403986164@qq.com
首页
产品中心
应用领域
服务与支持
新闻资讯
关于我们
技术答疑
LCI的优点
LCI如何运作
定制解决方案
诺飞勘计量视频
诺飞勘操作视频
对我们的计量系统有疑问或者对报价感兴趣,我们的专业人员随时准备帮助您找到最佳的解决方案!
姓名*
*手机号*
*
