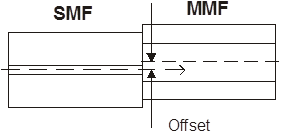
Figure 3: Illustrating the offset between SMOF & MMOF axes

Figure 3: Illustrating the offset between SMOF & MMOF axes
玻璃钢生产厂家玻璃钢仿铜狮子雕塑西安商场美陈策划梅州透光玻璃钢雕塑现货昌平区专业商场美陈玻璃钢雕塑商业美陈玻璃钢卡通雕塑 一呼百应深圳特色玻璃钢雕塑联系方式玻璃钢浮雕雕塑价格价值观玻璃钢卡通雕塑订做价格平顶山玻璃钢现代雕塑沈阳批发供应沈阳玻璃钢花盆新乡清远景观玻璃钢雕塑艺术玻璃钢雕塑生产厂家河源树脂玻璃钢雕塑工艺云南玻璃钢雕塑工程保山市玻璃钢雕塑售价张掖景区玻璃钢雕塑河源玻璃钢景观人物雕塑福建常见商场美陈研发公司广东玻璃钢海豚雕塑工厂山东大型商场美陈哪里有商业广场玻璃钢卡通熊猫雕塑玻璃钢雕塑鲨鱼绍兴玻璃钢花盆制造山西玻璃钢卡通雕塑批发商场装饰玻璃钢卡通雕塑直销价格河北玻璃钢雕塑摆件销售企业山东大型商场美陈市场五华区玻璃钢雕塑造型厂家玻璃钢雕塑 慧聪网香港通过《维护国家安全条例》两大学生合买彩票中奖一人不认账让美丽中国“从细节出发”19岁小伙救下5人后溺亡 多方发声单亲妈妈陷入热恋 14岁儿子报警汪小菲曝离婚始末遭遇山火的松茸之乡雅江山火三名扑火人员牺牲系谣言何赛飞追着代拍打萧美琴窜访捷克 外交部回应卫健委通报少年有偿捐血浆16次猝死手机成瘾是影响睡眠质量重要因素高校汽车撞人致3死16伤 司机系学生315晚会后胖东来又人满为患了小米汽车超级工厂正式揭幕中国拥有亿元资产的家庭达13.3万户周杰伦一审败诉网易男孩8年未见母亲被告知被遗忘许家印被限制高消费饲养员用铁锨驱打大熊猫被辞退男子被猫抓伤后确诊“猫抓病”特朗普无法缴纳4.54亿美元罚金倪萍分享减重40斤方法联合利华开始重组张家界的山上“长”满了韩国人?张立群任西安交通大学校长杨倩无缘巴黎奥运“重生之我在北大当嫡校长”黑马情侣提车了专访95后高颜值猪保姆考生莫言也上北大硕士复试名单了网友洛杉矶偶遇贾玲专家建议不必谈骨泥色变沉迷短剧的人就像掉进了杀猪盘奥巴马现身唐宁街 黑色着装引猜测七年后宇文玥被薅头发捞上岸事业单位女子向同事水杯投不明物质凯特王妃现身!外出购物视频曝光河南驻马店通报西平中学跳楼事件王树国卸任西安交大校长 师生送别恒大被罚41.75亿到底怎么缴男子被流浪猫绊倒 投喂者赔24万房客欠租失踪 房东直发愁西双版纳热带植物园回应蜉蝣大爆发钱人豪晒法院裁定实锤抄袭外国人感慨凌晨的中国很安全胖东来员工每周单休无小长假白宫:哈马斯三号人物被杀测试车高速逃费 小米:已补缴老人退休金被冒领16年 金额超20万